In second grade, I bought a copy of a little handbook called “Save Our Planet,” full of simple ideas kids could put into action to be environmentally-friendly. One chapter was about starting a compost heap, which I’ve always wanted to do . . . but never did until this past spring. See, progress, at the age of 35!
In case you’ve ever thought this was a good idea, too, I can vouch for it. It’s simple to put together, and has gone miles toward reducing the amount of trash we throw away each week.
I explained to my son that we were going to make some “good dirt” to use for growing flowers next year. He also seemed intrigued that we could “fill it with worms” to help us make the dirt. Mostly, I think he believes we can use the “good dirt” to grow a beanstalk in our backyard next year and he’ll be able to climb up and meet a giant. For now, we’ll indulge this idea.
Here are some tips for starting that long-awaited compost pile:
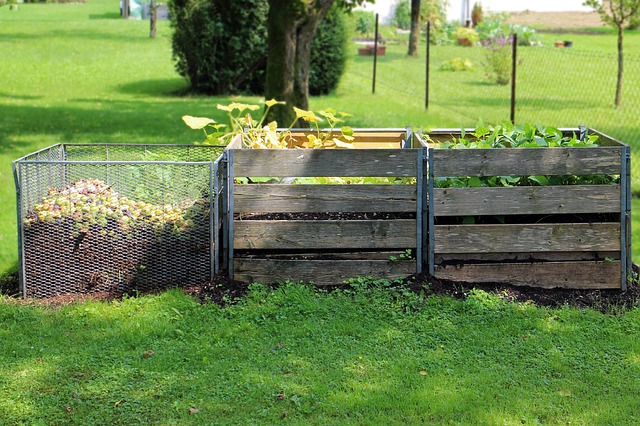
Step 1: Buy or build a compost container. There are fancy-schmancy buckets that sit on your countertop and at the push of a button will compost your food scraps into clean, handy pellets. But if you don’t have $250-$300 to spend, there’s quite a range of containers on the market, from stainless steel countertop buckets to plastic aerated bins for the backyard to simple DIY compost trays made from scrap wood. We went with a mid-range plastic backyard bin with lots of air holes.
Step 2: Find a warm, sunny location for your bin and stake it into the ground. Do NOT place it close to your house or garage . . . when the decomposition processes heat up (literally), you don’t want to run the risk of your compost combusting and setting your house on fire. Ideally, your location will have good drainage so your compost won’t end up sitting in a puddle after a heavy rain.
If you’re putting it in your yard, make sure it’s far back enough from your house to avoid any unwanted smells or pests making their way into your home. Compost will attract loads of flies in the bin, so avoid your grilling area. And don’t put it too close to wooden fences, as the decaying material may also start to decompose the fence. You can transplant some earthworms to the area, if you wish, but they’ll probably find their way in anyhow.
Step 3: Compost away! Start separating out your food waste to toss in the compost bin a few times a week. Each time you toss in a new batch, use a long stick or shovel to give the waste a good stir in order to let it “breathe.” You’ll want to be sure to keep it moist, but that is pretty easy if you are always tossing in leftover fruits and veggies. If you are only composting yard waste or if you’re adding in dry straw, you may need to spray it down with a thin film of water every so often.
Our goal will be to let the compost mature for awhile and let everything break down. It will be ready when it’s dark brown or black and has a nice “earthy” smell. Compost piles tend to go dormant during the winter months, but the decomposition process will start again once the weather warms up (over 50 degrees or so). Once it’s time to plant flowers and such, we can mix our compost with soil (ratio: about 30% compost to 70% soil) and hope for a much prettier flowerbed than my non-green thumb (it’s more of a Grim Reaper Thumb) has ever been able to produce before.
What to compost: fruit and vegetable peels and rinds, tea bags, coffee grinds, eggshells, compostable packing material, straw, sawdust, grass clippings, backyard leaves and weeds (if they are dried out and have already seeded). It’s good to keep an even mix of wet or “green” material (your fruit and veggie waste, coffee grinds) and dry or “brown” material (straw, wood chips, browned weeds, leaves and dry grass clippings).
What NOT to compost: chemically-treated wood, meat trimmings, grease, bones, milk products, bread and pastry products, dog and cat fecal matter. These will attract small rodents and other unwanted vermin!
Pros: Composting is easy to do if you’ve got a couple of spare minutes to sort out your food and yard waste. It cuts way down on your trash and the only expense is the container you choose. To my surprise, it really doesn’t smell too bad either, if you are composting the correct items and giving it enough air circulation.
Cons: It can be a bit annoying to go outside and stir the compost pile during the week, but my son likes to check out what the worms are doing, so you can make it into a game with your kids. Give them a magnifying glass or microscope and let them check out what the bugs are up to.
Also, be sure to hold your breath and turn your head to the side when you take off the lid of the bin so you don’t end up with a mouthful of flies.
Good luck and happy composting!